Posts mit dem Label Papercrafts werden angezeigt. Alle Posts anzeigen

23. Januar 2017

Making Memories | Erinnerungskärtchen DIY

Ich habe da mal was gebastelt. Mal ist gut, hat ewig gedauert.
Die Mamis unter euch wissen ja, wie das so ist mit einem Baby: Ständig lernt es etwas dazu und kann mehr und macht lauter lustige Sachen und ganz ganz viel zum allerersten Mal. Auf dem Bauch liegen, ohne sofort loszubrüllen, zum Beispiel. Auf dem Bauch liegen und lächeln. Sich in Bauchlage auf die Unterarme hochstützen. Das erste Mal in Bauchlage nach etwas greifen. Auf dem Bauch liegend mit etwas spielen... Es ist sozusagen eine ganze Flut an "Meilensteinen", jeden Tag. Weil für eine Mutter (besonders mit dem ersten Kind) lauten die Meilensteine nicht nur "Drehen, krabbeln, laufen, sprechen". Oooh nein. Nein nein nein. Letztens habe ich Ellinor in den Autositz (AKA Staatsfeind Nr. 1) gesetzt und sie hat ... gelächelt! Gelächelt statt geschrien als wäre der Leibhaftige hinter ihr her! Zum allerersten Mal! Und ja, während andere jetzt müde lächeln - für mich war das ein riesen Durchbruch im Leben meines Babys.

Der Liebste meinte letztes, man müsste sich diese Meilenstein-Momente, die großen und die etwas kleineren, doch eigentlich aufschreiben, damit man später in 10 Jahren noch weiß, was E wann gemacht, gesagt und gelernt hat.
Recht hatte er.
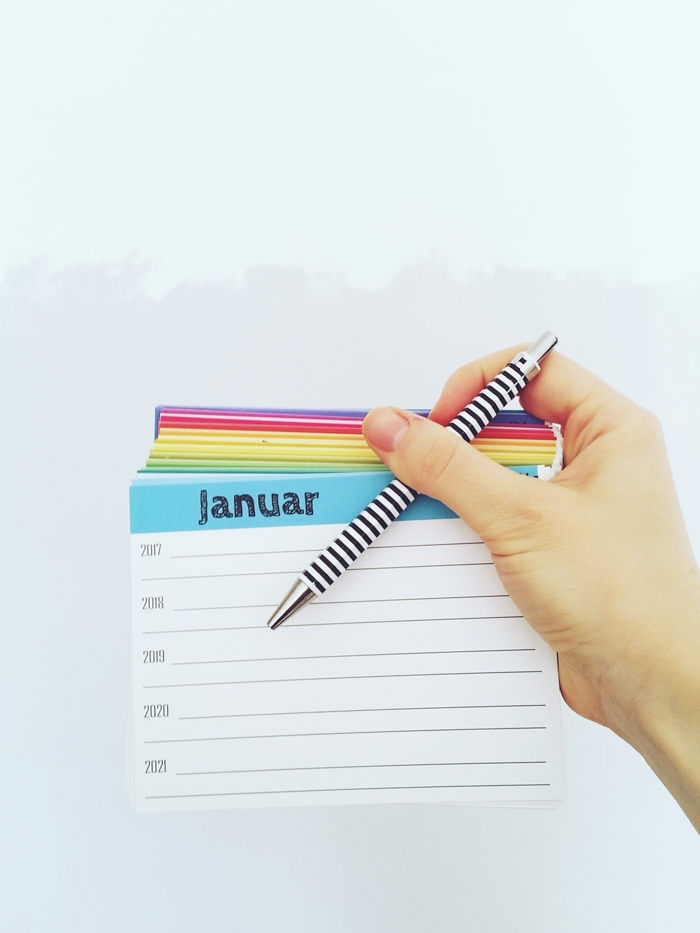
Also entwarfen wir ein paar hübsche Kärtchen, die nach Monaten, Kalenderwochen und Regenbogenfarben (letzteres war natürlich meine Idee!) geordnet sind, und auf denen man vorne und hinten auf 2 Zeilen kleine Notizen vermerken kann - und zwar von 2017 bis 2026! 10 Jahre lang! Irgendwann kann man dann nachsehen, was diese Woche besonderes passiert ist, was vor einem Jahr in dieser Woche und was vor 5 Jahren. So hat man nicht nur viele kleine Erinnerungen, sondern kann auch sehen, welche Entwicklung es im Laufe der Jahre gegeben hat. Natürlich geht das ganze auch mit anderen Dingen, als den Baby-Meilensteinen. Wir werden einfach immer eintragen, wenn etwas Schönes, Spannendes, Erinnerungswürdiges passiert ist. Babybezogen oder nicht. Ich freu mich drauf.

Und da ich gerne teile (und weil es so viel Arbeit gemacht hat), habe ich heute die Vorlage für alle, die auch gerne so ein schönes Erinnerungsprojekt starten wollen.


Eine kleine Anleitung:

Das PDF-Dokument besteht aus 53 Seiten: 52 Vorderseiten, mit den Kalenderwochen drauf, und eine Rückseite. Das Kartenformat, das ich verwendet habe, ist 13,75cm x 10,5cm. Das ist etwas ungewöhnlich, weil ich weiße Pappe wiederverwendet habe, die beim Basteln der Rahmen für meine Stickbilder übrig geblieben ist, und die hatte nun einmal diese Größe. Schneidet euch also, bevor ihr mit dem Drucken beginnt, 52 Karten aus dünner weißer Pappe oder stabilem Papier in der entsprechenden Größe zu und stellt vor dem Drucken diese Größe auch als Druckerpapierformat ein, sowie "Randloser Druck".
Testet am besten einmal, ob beim Drucken alles funktioniert. Dann druckt zuerst Seite 1 bis 52. Das sind alle Vorderseiten. Danach druckt ihr 52 Mal die Seite 53 auf die Rückseite aller Karten. Voilà! Fertig sind die Erinnerungskarten. Jetzt nur noch einen hübschen und leicht erreichbaren Ort zum Aufbewahren finden und fleißig Erinnerungen aufschreiben!

Viel Spaß dabei!

12. März 2015

Stitchable notebook | DIY

Super cool DIY project ahead!
 photo IMG_0556_zpsb5o31fyg.jpg
 photo IMG_0553_zpsdqb4mmxd.jpg
 photo IMG_0555_zpsaunm2pqr.jpg
 photo IMG_0560_zpsllbvocyv.jpg
Hi. My name is Kathie and I'm a notebook hoarder. I have them in all sizes and colors and shapes, soft cover, hard cover, ring book. Most plain, because I once had big crafty plans with them. I have them all. In my defense, I use them. Only not as fast as I buy new ones. I know that I'm not the only one! So let's take a plain notebook, or in this case: sketchbook, and turn it into something awesome. Like this one with the stitchable cover that can be embroidered and re-embroidered with a different look every months. Or week. Or day. It's really fun and easy to make, too! And, as a bonus, you'll be a pro in putting nails into walls after this DIY, and who wouldn't want that!?

You don't need any embroidery skills to do this craft.

First, supplies:
- notebook or sketchbook with a hard cover (I used this one)
- pen
- triangle ruler
- 2 nails, a tiny one and a bigger one
- hammer
- thick felt mat
- embroidery thread
- needle, blunt tip

 photo IMG_0530_zpskjvb4om7.jpg
Step 1: Draw a grid of dots onto the front cover. Use the triangle ruler to space the dots 1 cm apart.
 photo IMG_0539_zps0ozwgwzu.jpg
 photo IMG_0547_zpsgqcb8ray.jpg
Step 2: Open the sketchbook and place only the front cover onto the thick felt mat. Use the tiny nail and the hammer to create a hole in every dot. Repeat with the bigger nail to widen the holes. The embroidery needle should now fit easily through them.
 photo IMG_0551 Kopie_zpss8dvrjdq.jpg
Step 3: Start stitching! Think of a pattern or motif and stitch away. The spacious grid allows many different designs and the embroidery is easily removable so you can reinvent the notebook anytime you want! Happy crafting, everyone!

10. Januar 2015

Embroidered photos | DIY

My favorite ways to preserve memories is through pictures. I love looking through old black and white photos of my (early) childhood and even when I can't remember the actual event in the picture, they mean the world to me.
I found this picture of my mother and younger brother at the baltic sea, in front of them a somewhat shapeless heap of sand that I think was supposed to be a pretty sand castle. Oh too sad! But why not add a little fun and pops of color to the photo and 'build' one for them ... with thread!?
This is a fun craft that combines photography and embroidery. How cool is that? I can remember I did this kind of photo-embroidery-thingy when I was a kid so it's also a craft revival. Yay!
Don't fear, you don't need any embroidery skills for this.

Step 1: Find a photo that you want to embellish and print it out. In order to prevent the paper from ripping at the places where I would have to push the needle plus thread through, I printed on 300g/m³ paper (this) and it worked really really well.

Step 2: Draw your design onto the photo. Using similar colors to the thread colors you want to use makes the lines practically invisible. I added boats, a fish, a bucket and a sand castle to the picture.
Step 3: Another precaution to keep the paper from ripping (and to make your work a lot easier) is to punch all the holes before stitching. I used a simple pin to push a hole in every corner and crossing on my designs.

Step 4: Now chose your thread colors and start stitching. Trace all the lines. You can also retrace lines in the photo or fill an area by stitching many lines next to each other.

And there it is - a very personal and colorful work of art! These make great gifts for your loved ones, too! I made this embroidered photograph the week before Christmas in order to give it to my mother but decided against it last minute (too many photo-related gifts in the past and they have only so much room in their house). Now its hanging in our work space and looks so cute that I'm thinking about making some more to keep it company and look extra cute together.

There are very cool versions of embroidery on photographs on the internet, too. Have a look at these awesome projects/artworks:

17. Februar 2014

DIY: Easy Paper Plate Baskets

This project isn't very innovative as paper plate baskets are, well, all over the Internet. But of course I couldn't resist the simplicity of it all and had to try it out! It does work. No surprise there.
I tried to give my paper plate baskets a new twist by cutting of the rippled edge and by sewing it together instead of using glue or masking tape. I really like the simple classiness of my paper plate baskets.
In case you like it too, here's what you'll need:
paper plates, scissors, embroidery thread, needle
[1] Cut off the paper plate's rippled edge.
[2] Cut and fold the plate like shown in the picture.
[3-4] Fold the basket and stitch a simple "X" to secure the side parts.

All done! 5 minutes and totally inexpensive, just how we love it!
I used a few of these paper plate baskets for my stitching workshop to store the embroidery threads!

28. Juni 2013

DIY: Easy sewn paper bunting!

I'm not really sure if it's appropriate to call this blog post a DIY. Because it's so easy, I could describe everything with a single sentence. And I only have one short gif of the whole process! But well, this bunting is worth your while, so keep reading (I'll try to stretch it to more than one sentence)!
I made this bunting for our tea party last weekend. I was planning to have all the cake and donuts and stuff on the small shelf between the windows in our living room. Above said shelf: Huge space of blank wall (I kept telling the boyfriend that I needed a solution for this blank wall over and over again). And blank wall isn't the kind of backdrop I'd choose for cakes. Or anything. Time was short, in fact, it was past midnight and the party the next day. So this is what I did:
[1] I cut some colorful paper into 3inch  wide pieces and drew triangles on them, which were 2.5 inches wide and 3 inches long (I used the whole width of the paper pieces) The size is not overly important for the bunting, you could make the triangles any size you want.
[2] I gave the boyfriend a pair of scissors and let him help me with the cutting. We did a lot of cutting!
[3] Get your sewing machine ready, choose some colorful thread and then sew along the upper edge of the first triangle let the next triangle follow directly afterwards and just keep sewing.
[4] When all triangles are sewn up, you're ready! Hang the bunting and enjoy the colors! I hang mine with a little bit of pink washi tape and I think it's fantastic!

15. Februar 2013

Tiny Origami Boxes DIY


These last few days I spent my new free time with all the small and simple things that make life so lovely: sleep, a good book, donuts, late night walks, thoughts about science-unrelated things and one or two hours of Sims3 (I swear that's the only addiction I have!!!). I also started crafting again, as promised, and made these cute little Origami boxes this morning. They are so simple and so adorable I made whole bunch. Because... there's always use for tiny boxes, right? They are the perfect little gift boxes or jewelry storage or they could hold small things on your desk or smaller craft supplies. Or just use them to decorate your room, just because they're so darn cute!

Supplies: 2 sheets Origami paper (6''x6'' gives a 2''x2''x1'' box). Scissors, ruler and pencil.
And just because I had so much fun making them and also because I found it difficult to explain the steps how to fold such a box, I made a little gif for you! It shows how to fold one part of the box. For the second half, cut of 1/4 inch on two edges of the paper making a 5,75''x5,75'' square. This helps you to put both parts together in the end without getting wrinkles or dents. Cut of 1/4 inch and they fit together just perfectly.


If you can't follow my gif because it's too fast or too complicated or too bad, I recommend this page. It's also only an animation, but you can stop it or speed it up or slow it down. Anyways, I hope you have just as much fun as I had making these.

Have an awesome day!

7. Februar 2013

DIY Papercut Valentine's Card

Hello my friends! I had my second of three exams today and now I'm back for a cute Valentine's Day DIY that I whipped up a few weeks ago already. I'm so very pleased with the result and I hope you are, too. The words on the card can be changed to whatever you like and they will be in your handwriting! Such a very special and personal gift for a loved person!

You'll need: White and mint green card stock and some origami paper or similar paper with a pastel colored delicate flower pattern. A piece of paper to draw your design on. A Ruler. A pencil and a thin black marker. A Cutter, a stapler and paper glue.
[1] With ruler and pencil draw two straight lines, 5 inches each. Write your message on the middle 3 inches (or less) of each line. Use rather big letters and leave enough space between words, it will be useful for the next step.
[2] Now take the black marker and draw around the pencil lines. Leave an equal distance from both sides of the pencil lines and trace around the straight lines as well. Cut the paper you drew on to size and staple it to the mint-colored card stock.
[3] Start cutting out the design by tracing only the black lines and cutting through the white paper and the mint card stock at the same time (no pencil residues on the card stock!) . And it might seem easiest to start cutting the outline first, but you really should start with the smallest bits and tiniest spaces. It will save you a lot of work and time if you do so. Trust me!
[4] If you're done cutting the words, take a 10''x7'' piece of white card stock and fold in half (5''x7''). Cut out a heart-shaped piece of card stock (max. width 5 inches of course) from the front side of the card.
[5] Glue the mint colored pieces to place from the back side.
[6] For the inlay, take a piece of card stock or paper that is a little bit smaller (mine is folded ca. 4.5''x6''). Glue the origami paper to the outside of the inlay card and voila! a beautiful background for your minty message!

You can now finish the project with a love note inside the inlay, add a lipstick kiss or two, and then surprise the one special person in your life with this beautiful and very personal Valentine's card.


25. Januar 2013

Cake Toppers for Valentine's Day


To get in the mood for Valentine's Day I whipped up a few "love"-ly projects that I want to share with you. The first idea I had were heart-shaped felt cake toppers, but because I couldn't find red felt in my bags and boxes of craft supplies I changed my mind and came up with plain and glittery paper cake toppers and I'm pretty much in love with them! They are fast and easy to make and oh so pretty!

You'll need: Red and pink card stock. Glue. Scissors. Red and pink glitter (I used colorless glitter for the pink hearts, works just as well.). Wooden sticks.
Start with cutting out hearts. I chose some bigger and some smaller hearts in pink and red. Don't forget to make pairs of two, because you need a front and back side! Now take a pair of two similar paper hearts and spread glue all over one of them. Place the stick on it and cover with the second paper heart. You might have to press them together for a little while. Let dry completely.
Now you could leave the hearts like they are like in the second picture above, but who doesn't love a little glitter? For the glitter cover one side of the heart with glue and sprinkle with glitter. I didn't sprinkle. I drowned it in glitter (and it was fuuun!). Let the glue underneath dry for a bit and tap off loose glitter. Repeat for the other side if you like.

I made mine with only one glittery side. And if you're wondering why I named the project "cake toppers" and then only put them in a glass vase: I'm sorry! I didn't have a cake at hand and was neither willing to make one nor did I want to go out and buy one. I had a lazy day. But I actually think they look great in a vase, too!

3. Dezember 2012

Introducing: Boyfriend's Advent Calendar


Good morning, everybody! Finally, Advent calender season has begun and I'm save to blog about the calender I made for my boyfriend this year. After spending weeks for his Advent calendar of last year, this one was a pretty fast one to make. During November I really took my time to collect small gifts and treats here and there that I wanted to use as a filling and started an exciting (and still top secret because the boyfriend is reading this blog) project for St. Nicholas Day.
When I had everything together (which was basically on the last day of November), I put everything I had in 24 striped candy bags , embellished them with numbers (free printable here) and closed them with some washi tape. Since I lacked a box in a proper size, I made one myself using some leftover cardboard and the same washi tape. Et voila! Simple and yet so beautiful! The boyfriend is happy, too!

What he found in his calendar so far: A different bag of tea every day (yeah, we're kind of tea addicts), today was chai tea. A small Christmas ornament. A small bag Jack Link's Chicken Bites Curry (You know, he's a guy. Guys love meat for some reason). Lots of Chocolate. No Advent Calendar without chocolate!

We're just three days in and I usually start slow so much more, and more exciting stuff, is about to come! I'll make sure to post some updates. Be excited for the St. Nicholas Day project!
Related Posts Plugin for WordPress, Blogger...