Posts mit dem Label Sponsored werden angezeigt. Alle Posts anzeigen

30. Juli 2017

Die Sache mit dem Regen.

Wir sind wieder da! Einen ganzen Monat waren wir unterwegs zwischen Familienfeiern, Heimatbesuchen, Freunden, Familie, Urlaub. Ach ja, und einer Woche spontanen Besichtigungen von potentiellen Hochzeitslocations.... Wir sind nämlich verlobt!!! Der Liebste hat in Schweden die Frage aller Fragen gestellt, und ich habe JA gesagt! Oder, um es mit seinen Worten zu formulieren: Er hat von dem Geld, dass er nicht hatte, einen überteuerten Ring gekauft, um mir eine Frage zu stellen, auf die er die Antwort schon wusste. Ja, wir sind echte Romantiker. Aber mehr dazu in einem anderen Post und zurück zum Urlaub.

Kennt ihr das auch? Da fahrt ihr in den Urlaub und statt Sommer, Sonne, Sonnenschein bekommt ihr Regen, Wolken, kalt, während Zuhause die nächste Hitzewelle ausgebrochen ist? Tja, mit dem Wetter war das ja echt so eine Sache auf unserer Reise. Wo wir auch hinfuhren - wir brachten Regen mit. Während in Schweden warme Pullover und Regenschirme zu unserer täglichen Ausrüstung gehörten, bekam der Liebste auf seinem Handy am laufenden Band Hitzewarnungen aus Deutschland.
Aber auch, wenn das jetzt nicht so klingt, fand ich das gar nicht schlimm. Ich bin nämlich gar kein Mensch für Hitze und pralle Sonne, und so hatten wir ganz nebenbei perfektes Wetter zum Babytragen. Dass Träger und Baby schmelzen war ja meine größte Sorge, als wir uns vor dem Urlaub dagegen entschieden den Buggy einzupacken. Mit Baby vor dem Bauch oder auf dem Rücken wurde durch die schönen schwedischen Wälder und Wiesen und Dörfer gewandert, und bei Regen wurden eben die Regenschirme aufgespannt oder der neue, gelbe Trage-Regenponcho aus dem Rucksack geholt.
Das Team von GoFuture with Love hat uns den Poncho gerade noch rechtzeitig vor unserer Abfahrt nach Schweden zugeschickt und ich bin froh, dass wir ihn hatten, weil es manchmal doch etwas umständlich ist, überallhin Regenschirme mitschleppen zu müssen. Beziehungsweise das zusätzliche Gewicht, denn Ellinor trägt gerne ihr eigenes Gepäck, vorzugsweise ihre Wasserflasche oder eben den Regenschirm (Den ließ sie mir letztens direkt auf den großen Zeh fallen. Aua.).
Ich bin ja ein großer Fan vom klassisch gelben Friesennerz. Logisch, dass es daher die gelbe Variante sein musste! Netter Nebeneffekt: Mit dem gelben Partyzelt wird man auch bei trübstem Regenwetter und Nebel nicht übersehen. Ha!
Letztens, als wir gerade in Plau am See bei meinen Eltern waren, und trotz Wetter-App und Regenradar von einem heftigen Platzregen überrascht wurden, da habe ich mir den Regenponcho sehnlichst herbeigewünscht. Der lag natürlich schön trocken zuhause, als wir frierend und klatschnass bis auf die Knochen, mit bitterlich weinendem Baby dort ankamen. Typisch. Aber wenn man ihn dann dabei hat, ist er ein echt praktisches Teil, der sich im Fall der Fälle ruck-zuck überwerfen lässt.

Der Poncho ist relativ kurz - er geht gerade so über den Po - deshalb wird man bei richtig heftigen Regengüssen wohl trotzdem ordentlich nasse Beine bekommen. Bei leichtem Regen und Nieselwetter reicht die Länge aber völlig aus, und so lässt er sich auch recht klein zusammenfalten und verstauen.
Apropos verstauen - ich hätte eine Tasche oder etwas Ähnliches dazu sehr praktisch gefunden um den Trageponcho so im Rucksack zu verstauen, dass er nicht ständig im Weg ist. Denn manchmal, wenn das Kind jetzt sofort einen Snack braucht oder du verzweifelt in den Untiefen deines Rucksacks nach einem Tuch suchst, weil das Kind sich schon wieder von oben bis unten mit Essen beschmiert hat, statt es zu essen... dann möchtest du dich nicht erst durch ein Meer von gelbem Stoff wühlen müssen. Aber man weiß sich ja zu helfen, und so wurde der Poncho kurzerhand mit einem Stoffband gebändigt.

Wenigstens einer.

Denn das Kind möchte seit einigen Wochen nur noch laufen. Und stehen. Das hat uns, als wir nach Wochenlanger Hitzewelle in Süddeutschland im nasskalten Schweden ankamen, erst einmal vor einige Herausforderungen gestellt. Barfuß laufen lassen ging da plötzlich nicht mehr. Und findet mal in den dünn besiedelten Wäldern von Smaland einen Laden für Babygummistiefel. Unsere Lösung: Vermeidung. Möglichst weit vom nassen Boden fernhalten. Ab in die Babytrage. Und wenn das Kind unununbedingt jetzt sofort die Katze streicheln belästigen musste, ließen wir es eben die Socken einsauen und wechselten diese anschließend. Das funktionierte ganz gut, ich bin jetzt aber trotzdem auf der Suche nach guten Gummistiefeln für Babys/Kleinkinder.
Vorzugsweise in friesennerzgelb, versteht sich.


14. Oktober 2016

"Wie jetzt, ihr habt keinen Kinderwagen!?"

Wenn man das erste Mal schwanger ist, sieht man sich sehr schnell mit einer schier endlosen Liste an Dingen konfrontiert, die man sich für das Baby unbedingt anschaffen muss: Babybett, Wickeltisch, Windeln, Schnuller, Babykleidung, Wärmestrahler, Spielbogen, Nachtlicht, Autositz, Kinderwagen. Um hier nur ein paar zu nennen. So habe ich auch schnell herausgefunden, wie viel ein Baby eigentlich kostet, bevor es überhaupt da ist.

Ein großes Thema war da der Kinderwagen. Ein Kinderwagen gehört zur Grundausstattung, klar. Aber je länger ich darüber nachdachte, umso unpraktischer erschien mir die ganze Sache. Wo soll er stehen, wenn er nicht benutzt wird? Im Keller? In der Wohnung ist kein Platz, der Keller hat eine superschmale, steile Treppe. Da schleppe ich das Teil bestimmt nicht rauf und runter! - dachte ich mir. Preislich ist so ein Teil ja auch nicht gerade günstig. Besonders, wenn dem Liebsten, der eben beruflich mit solchen Sachen zu tun hat, wichtig ist, welche (Kunst-)Stoffe an die Haut und in die Atemwege des Babys kommen. Dann die Gehwege hier im Ort. An den meisten Stellen sind sie so schmal, dass zwei Personen gerade so nebeneinander laufen können, ohne auf die viel befahrene Hauptstraße zu kippen. An manchen Stellen geht es auch nur hintereinander. Gerne schräg und uneben und halb von Autos zugeparkt. Ich sah mich schon mit Kinderwagen einen dieser Gehwege entlang gehen, der Liebste aus Platzgründen hinter mir (Romantik pur). Vor mir ein parkendes Auto, neben mir der Feierabendverkehr, in dem ich jetzt eine Lücke abpassen muss, um mit dem Baby auf die Straße und um das parkende Auto herum zu manövrieren...

Auf meine Ankündigung hin, dass wir uns keinen Kinderwagen anschaffen werden, reagierte meine Mutter mit Unverständnis, um es mal nett auszudrücken. Stattdessen besorgten wir uns eine Babytrage und zwei Tragetücher und übten schon mal die eine oder andere Wickeltechnik mit einer Puppe.
Jetzt gab es nur noch ein klitzekleines Problem in meinem raffinierten Plan: Das Baby würde sein erstes halbes Lebensjahr im Herbst und Winter verbringen. Wie kann ich mein Kind bei Schnee und Eis tragen, dachte ich mir, ohne, dass einer von uns beiden friert? Das Internet sagte, das Baby würde von meiner Körperwärme ausreichend gewärmt und ich solle einfach die Jacke vorne auflassen. Ich. Die am liebsten im dicksten (Fake-!)Pelzmantel rausgehen würde, sobald das Thermometer unter 15°C sinkt. Ich lasse bestimmt nicht meine Jacke auf! Die Alternative, das Baby über der Jacke zu tragen und ihm einen warmen Anzug anzuziehen, schien mir wiederum reichlich umständlich. Ich stellte mir das vor, wie ein riesiges Michelin-Männchen, das mit einem kleineren Michelin-Männchen vor der Brust durch den Schnee stapft.
Ich war ehrlich gesagt ziemlich ratlos.

Dann, als hätten sie es gewusst, erreichte mich eine E-Mail von DaWanda, ob ich nicht eine Tragejacke von GoFuture with Love ausprobieren möchte. Auf jeden Fall wollte ich!
Ich suchte mir eine herrlich warm gefütterte Shell Concordia Kängurujacke in olivgrün aus, und schon kurze Zeit später brachte mir der Postbote meine eigene, wundervolle Tragejacke. Ich liebe alles an ihr! Und das sage ich nicht, weil ich es muss, sondern, weil es meine ganz ehrliche Meinung ist. Das fängt schon bei den kleinen Dingen an, wie den gefütterten Taschen. Gefütterte Taschen! Ich hatte mal in der 10. Klasse einen Wintermantel, der mit warmem Teddyfell gefütterte Taschen hatte. Ich hatte niemals kalte Hände. In den Pausen auf dem eisigen Schulhof durften sich meine Freundinnen eine Tasche "borgen", um ihre Hände zu wärmen. Es war eine tolle Zeit - bis mein Cousin an Silvester versehentlich einen Böller in eine der Taschen warf und das Teddyfell verschmorte...
Die Tragejacke funktioniert mit einem Trageeinsatz, der vorne in den Reißverschluss eingezippt wird. So hat das Kind, das unter der Jacke in der Babytrage oder einem Tuch getragen wird, genug Platz (und eine eigene Kapuze!). Man kann die Jacke von GoFuture, wenn man mal ohne Baby unterwegs ist, also auch ohne Einsatz tragen. Wie eine normale Jacke eben. Super Sache, so hat man länger was davon!
Der Knaller für mich Hochschwangere war ja auch der Schwangereneinsatz, der ebenfalls dazu gehört. Eine Baucherweiterung zum reinzippen quasi. Das Teil war meine Rettung, als aus dem Septemberbaby doch ein Oktoberbaby wurde, es plötzlich nicht mehr Sommer sondern kalt und regnerisch war, und schon längst keine meiner anderen Jacken mehr zuging. Großartig!

Die Fotos, die ihr hier seht (die mit Trageeinsatz), entstanden beim allerersten Spaziergang, den ich mit unserer kleinen Ellinor unternehmen durfte. Da war sie gerade eine Woche alt. Bis dahin hatte ich Bettruhe verordnet bekommen. Ihr erster Spaziergang war es allerdings nicht, der Papa war vorher schon einige Male mit der Babytrage unterwegs gewesen. Am Rhein und in den Weinbergen und im Ort.
Wir wählten für unseren Spaziergang das Naturschutzgebiet. Oder eher den Weg dorthin. Ich war leider noch nicht so gut zu Fuß, sodass wir auf halbem Weg wieder umgedreht sind. Schön war es trotzdem! Und als wir so (nebeneinander!) einen dieser superschmalen Gehwege entlang gingen, kam uns von vorne ein anderes Pärchen entgegen. Mit Babytrage. Wir grüßten uns nett und teilten ein wissendes Lächeln...
Tragejacke von GoFuture with love via DaWanda


24. November 2015

No-sew felt baskets | DIY

A while ago Cat from Cut Out + Keep asked me if I wanted to try out a product or craft tool and write a tutorial and short review about it. That was actually several months ago, when we were all still wearing sandals and shorts and sunscreen. However, I said yes and got to try out the KAMsnaps and KAMsnaps tool! KAMsnaps have been all the rage for quite some time now but I never got the chance to try them for myself (and also I'm that slow) - until now. You can read a bit more about my experiences with the snaps and tools over at Cut Out + Keep.

Also, I whipped up a fun and easy tutorial for fun and colorful no-sew baskets made from only felt and KAMsnaps. The really fun part about those is that you can unfold the basket by opening all the snap closures and store them lying flat without wasting any space. Nice! I got the idea from the paper plate baskets that I made some time ago. I use them mainly to hold embroidery thread bobbins at my cross stitch workshops but found that they took up more room in my shelves than I liked when not used. Now with the felt versions that's not a problem anymore.
For the full tutorial head over to Cut Out + Keep!


10. August 2015

Buy less, make more! | 6 good reasons to make jewelry yourself, and why it's easy

I've been making my own jewelry ever since I can remember. Well, more or less, depending on my age. I've made necklaces with colorful wooden beads, friendship bracelets, earrings from buttons, all kind of things. Lately however I've been into simple necklaces that are basically made by combining a plain necklace chain with a pendant or a few beads. I love how they don't look all store bought and not at all handmade. Nothing against handmade, I love all things handmade, but I hope you know what I mean.
My favorite necklace at the moment is the one below, with the color sprinkled ceramic beads. You know how long it took me to make? A minute at most. You know how much it cost me? Under 1€. You know how many people asked me where I got it? Four up to now.

I knooow, I didn't really make this necklace. Not in a crafty kind of way. I assembled it. But still it's my own creation, I chose the supplies and  I thought of the design. No one else has a necklace like this and I'm pretty proud of it. 
So let's not argue about words but start making more jewelry ourselves. Here are 6 good reasons why:

1. It's easy

Jewelry making doesn't have to be difficult. You can make some very decent pieces in just a few easy steps. Take the basic pendant necklace consisting of a pendant and ... a necklace. Easy. Did you know that you can buy a lot of different pendants and supplies online? Choose your favorites and than its just one plus one and you have a great piece of jewelry!

2. It looks just like you want it to look

That also means, that it doesn't have to look handmade. You know best what you're looking for and what you want your jewelry to look like. By choosing the supplies and making it yourself, you have a lot more control over the look and style. Maybe next time, when you have a new piece of jewelry in mind that you can't find anywhere in the stores, try to DIY!

3. It's cheaper

Buying supplies and combining them at home can be a lot cheaper than buying it in the stores, especially for costume jewelry. You don't have to pay for brands, names and designs.

4. You choose which quality you'd like

This one goes with number three. If you like to buy costume jewelry and change your stock every few months, you can choose to by cheaper materials. I'm talking mostly about metals here: chains and jump rings and closures. You could go for gilded copper or tin instead of going for pure gold.
On the other hand, if you'd like your jewelry to last long and look pretty all the way, than you should go for higher quality metals.

5. You can make more

Your jewelry is broken, discolored or lost? No problem! Because you know where you got it from or have all the supplies still at home. A lot of shops sell their jewelry findings in multi packs, so it's easy to make more for your friends, make your favorite necklace in different lengths or create matching earrings.

6. It's all yours

You create unique pieces if you DIY jewelry! There's literally no chance you ever come across one person on the street who is wearing the same jewelry you are. And the best thing about it: if someone compliments you on it and asks where you got it you can smile and say 'I didn't buy that. I made it myself'. Best. Feeling. Ever.
To get you started on your handmade jewelry adventure, these are three necklaces that I made lately. The one on the left is my favorite necklace and I've been wearing it almost daily. If you'd like to recreate it, or one of the other, these are the materials that  I used:

ceramic beads
natural citrine pendant
ball chain necklace

For more jewelry tutorials check out my MAKE page!

11. Juli 2015

Cluster Rings | DIY

I'm not much of a ring person. I always think that rings look weird on my fingers and stunning on everybody else's. But maybe that's just because I'm not used to wearing rings much, I don't know. But then I found these perforated ring bases a while ago, that seemed just perfect for so many different kinds of rings. Today I'm teaming up with pandahall.com again to show you how to make cluster rings which are easy to make and also kinda look like a faux crystal rings with the faceted glass beads that I used.

What you need:


BEADS:
small beads (I used faceted glass beads in purple)

JEWELRY FINDINGS:
ring with perforated base (can't remember where I got mine - similar)

TOOLS & OTHER:
embroidery thread or similar
needle
scissors
Step 1: Cut a strand of embroidery thread, make a knot in one end and thread on a needle at the other end.
Step 2: Pull the thread through one of the holes that is close to the center of the base from below. Thread on three beads and pull the thread back through a hole next to it. Pull very tight. Wiggle the beads around a bit to make sure the thread is as short as it can get.
Step 3: Repeat step 2 a few times and working from the center outwards. Try to go through every hole once. After a few repeats you will notice that the beads will begin to stack up nicely and create a nice organic shape that slightly resembles a natural crystal.
Step 4: When you're happy with the size and shape of the cluster, weave the thread in on the underside of the  ring base and cut it off. All done!

You can play around with the look and shapes of these rings by threading on more or less beads every time or by working with a contrasting yarn or a thin wire (in the color of the ring base maybe). Or maybe try using beads in different colors!  The cluster rings are very quick to make so you may as well try out every option I just named in just one afternoon!

The second ring in the pictures was made with a neon orange thread which looks even brighter in reality. I also made this one by threading on only one bead at a time which makes it a bit smaller and flatter looking. Which one do you like better?

23. Juni 2015

Foodie Bracelets | DIY

I always thought that a person's favorite food tells a lot about them. My favorite foods probably suggest that I'm a fat teenager (the boyfriend commented that I forgot potato chips). Of course, if you're not so much into wearing your current food cravings around your wrist, you could spell out anything you want, really. But I think, food is great. I like food, you know.

Now, the tutorial is so easy that I didn't bother to take step-by-step pictures. These bracelets are basically the same elastic bracelets that probably all of us made as kids. Just not as colorful. Best thing about this: I made these 4 bracelets in about 20 minutes!

What you need:

BEADS & OTHER:
alphabet beads (I used acrylic beads in gold)
small beads (I used glass beads and chose faceted black ones)
black elastic cord
Step1: Cut the elastic cord to about 5-8 cm longer than your wrist's circumference. Thread glass beads and alphabet beads onto the elastic until they measure the same length as your wrist. If you want the bracelets to fit more loosely, maybe add one or two beads extra.
Step 2: Stretch the bracelet a tiny bit and make a knot to close it permanently. Cut the ends a little bit shorter.

Well, that was easy. Now make some more!


9. Juni 2015

Delicate beaded bracelets | DIY

Hello there! I'm back with a new fun jewelry project for you. I thought that my accessory stack was lacking a bunch of cute, summery bracelets that I could wear for pretty much any occasion and that would look good with most of my outfits. And this is what I came up with. I love the light and delicate look these bracelets have about them and how the faceted glass beads reflect the light (sparkly!). And they're easy to make, too! I can imagine making a whole collection in different bead sized and different colors and combining them to match any outfit I have. Sounds good? Join me and let's make a bunch of delicate beaded bracelets!

What you need:


BEADS:
small beads (I used glass beads and chose faceted black and purple ones)

JEWELRY FINDINGS:
chain
clasp
eyepins - the ones I used are 5cm long
jump rings (I used 4mm)

TOOLS:
sidecutter
round nose pliers
chain nose pliers
measuring tape

How it works:

1. String the alphabet beads and any other beads onto an eyepin. Make sure there are about 1.5 cm left at the end to create a second eye. Make a second eye at the end of the pin. It's not that complicated but I would advise you to practice it a few times beforehand. To make an eye, grip the pin with the chain nose pliers right behind the last bead and bend the remaining pin into an 45° angle. Now make a loop with the round nose pliers until the end of the pin points downwards, cut away the excess wire using the sidecutter and maybe correct slightly with the chain nose pliers again. Here's also a nice video tutorial.
 2. Measure your wrist. Then put the measuring tape flat onto a surface and put the eyepin and the clasp next to each other, starting at your wrist circumference and going downwards. Cut a piece of chain as long as the remaining length and cut it in half.

3. Now we put the bracelet together. Start by threading a piece of chain onto each eye of the eyepins. You might have to open the eyes up a bit to get the chain on, but make sure to close them thoroughly again afterwards.

4. Add the clasp to the other end of one of the chains just like you did with the eyes in the step before.
 5. The final step is to make the bracelet adjustable in length. To add a simple adjustable chain, just make a chain of 10 jump rings and combine it with the free end of chain.

We're done! This is a quick and pretty easy project to do on a free afternoon. For you and for all of your friends. You can easily make a bunch! These also make pretty birthday gifts. Try gold chain and findings instead of silver for a warmer, sunnier look that's perfect for summer.

21. Mai 2015

The greatest crochet statement necklace you ever made | DIY

We're teaming up with pandahall.com again for this great tutorial that I have for you today. This crochet statement necklace is one of my favorite jewelry DIY tutorials of all time! It's so gorgeous. And I'm not just saying that because I made it. I would totally buy that thing.

But before you stop reading because you think 'That necklace looks insanely difficult to make. I'm leaving.' or 'I'm a complete beginner in jewelry making, I can never make something so advanced.' or something like that - It is NOT difficult. It is not. If you know how to open and close jump rings and know basic crochet stitches (chain stitch, single crochet, double crochet) you can totally do this! The tutorial is lengthy but I tried to explain everything as clear and easy to follow as possible.

I always feel that the most difficult part about making a great statement necklace is to plan the design and to buy the right supplies. I already did the planning for you and I can help you with the supplies as well. So let's jump right in and make a crochet statement necklace!

What you need:


BEADS & OTHER:
small beads (I used glass beads and chose these cute faceted black ones)
stretchy jersey fabric or t-shirt yarn (buy or DIY)
cotton thread (nice and shiny)

JEWELRY FINDINGS:
thin chain
chunky chain - I got mine from the supercraft kit #14 but you can find similar chain here
jump rings (I used 4mm and 6mm jump rings)
end caps (4 mm in diameter)

TOOLS:
sidecutter
round nose pliers
chain nose pliers
needle
jewelry glue
bobby pin
scissors
crochet hook 3mm

How it works:


1. At this point I usually draw a sketch of what I want the necklace to look like. with the jersey woven through the chunky chain and the crochet part I found that difficult to draw, but arranging like in the picture above works, too. It helps to get a feeling for size and dimensions, too. The chunky chain is already cut to my desired length in that picture. You do that just by cutting it with a sidecutter.

If you don't use t-shirt yarn but jersey fabric, you now cut a longer piece that is about 4 cm wide and stretch it thoroughly. The edges will toll inward and you will end up with beautiful t-shirt yarn that is easy to use in the following steps.
2. Use the bobby pin as 'needle' for the t-shirt yarn. Lay the big chain in front of you and straighten it out, so the chain links are always at a right angle to each other. Now thread the jersey through the links. Go from back to front for the first link and from right to left for the second, back - front, right - left, back - front, and so on.
It's not that important in which direction you thread through the chain, but it's important that it's the same direction every time. You'll see a pattern form after a few links. Continue to the end of the chain.

3. So, you see that wavy pattern that the jersey makes, right? Up and down and up... The next step is now to put jump rings (7mm) around the bottom parts of the wave. This can be a bit tedious, but we are not in a rush, are we? Take your time. I left the two or three waves at the ends without jump ring, but you could continue until you reach the end.
 3. Now comes the fun part! Take your cotton yarn and the crochet hook (3mm) and let's crochet!
Start by making 10 chain stitches.

Now connect with the first jump ring at one end of the chain. To connect, go through the jump ring in the opposite direction you are working in and pull the thread through (I went from right to left, so the crochet hook has to go from left to right through the jump ring). You have now two loops on the hook. Pull the yarn through both.

Continue in chain stitch until you reach the next jump ring. For me that was three chain stitches between each jump ring. continue in this fashion until you reach the last jump ring. Connect and add 10 chain stitches at the end.

4. Turn your work like it's a normal crochet work. Work the next row in single crochet until you reach the third jump ring. Double crochet until there are three jump rings left. Finish in single crochet. Cut the thread and pull it through the last loop.
5. Now add the beads. I simply threaded the cotton thread onto a needle, put the beads into the spaces between the jump rings and pushed a needle through from left to right. Fixate at the ends, weave the ends in and you're done. Easy peasy.
6. No we're already at the finishing touches. First, add the end caps. To do so you twist the jersey and the crochet cotton thread ends together very tightly. Hold and cut very close to your fingers. Put a drop of glue into the end cap and put it onto the twisted ends. Repeat for the other side. Let dry.

7. Cut the thin chain to desired length (remove the bottom part). Make sure, the closure stays in the center of it. With a smaller 4mm jump ring connect the chain with the end caps.


Tadaa! I love my crochet statement necklace! I love the cool grey tones because they can go with basically everything. But I can imagine that the necklace would look just as great in brighter colors or with beads or crochet part in a contrasting color. What do you think?


12. Mai 2015

Alphabet pendants and how to make easy tassels | DIY

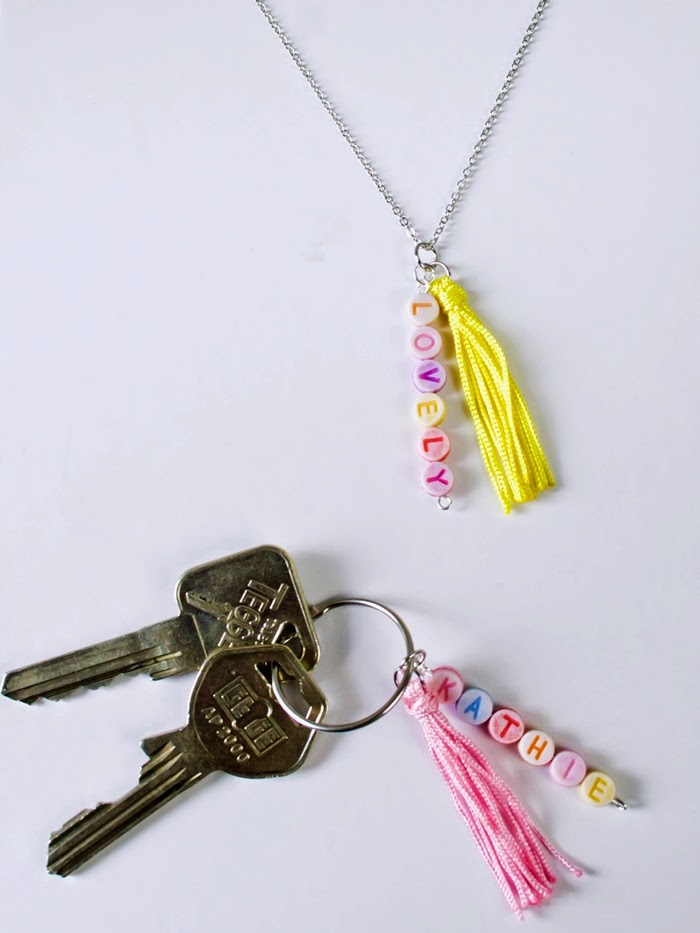
Hey guys! I hope you aren't yet tired of alphabet beads, because here comes another tutorial with pastel colored alphabet beads this time. We're making fun and easy pendants that can be used for personalized necklaces or keys or loads of other different purposes.  I'll also show you how you can make very easy tassels for jewelry without end caps and glue. It's a great project to make for or with kids!

What you need:


BEADS:
alphabet beads (I used acrylic beads in mixed pastel colors)

chain - if you want it to be a necklace pendant
eyepins - the ones I used are 5cm long and hold up to 5 alphabet beads. For longer words use longer eyepins.
jump rings (I used 4mm and 6mm jump rings)

TOOLS & OTHER:
round nose pliers
chain nose pliers
needle
nylon cord (similar here)
lighter

How it works:

1. To make a simple tassel you cut a long strand of the nylon cord and fold it in half and fold that in half and repeat until it has about three times the length that you want it to be. Pull it through one of the 6mm jump rings.

2. Fold the nylon cords over the jump ring like in the picture above. Find one of the two loose ends of the cord and thread it through the needle. Now wrap that loose cord around the whole strand of cords for a few times, just below the jump ring. While you hold everything tight with your left hand, push the needle down behind the wrap you just made, pull through and tighten up.

3. To finish up the tassel, cut it to your desired length and carefully melt the ends with a lighter to prevent the cords to unravel. You've made a tassel!

4. Now, the next steps are very similar to the instructions for the alphabet necklaces. String the alphabet beads onto an eyepin. Make sure there are about 1-2cm left at the end to create a second eye.

5. To make the second eye, grip the pin with the chain nose pliers right behind the last bead and bend the remaining pin into an 45° angle. Now make a loop with the round nose pliers until the end of the pin points downwards, cut away the excess wire using the sidecutter and maybe correct slightly with the chain nose pliers again. Here's also a nice video tutorial.

6. Add a 4mm jump ring to one end of the eyepin. Connect the eyepin and the tassel with a 6mm eyepin.

The pendant is now complete and can be strung onto a necklace or used as a key pendant or anywhere else you  would want to add a personal touch. I know that I had similar pendants on my pencil case and on my backpack in school. They would also make great gift tags for birthdays!


Related Posts Plugin for WordPress, Blogger...