Posts mit dem Label Gifts werden angezeigt. Alle Posts anzeigen

23. Januar 2017

Making Memories | Erinnerungskärtchen DIY

Ich habe da mal was gebastelt. Mal ist gut, hat ewig gedauert.
Die Mamis unter euch wissen ja, wie das so ist mit einem Baby: Ständig lernt es etwas dazu und kann mehr und macht lauter lustige Sachen und ganz ganz viel zum allerersten Mal. Auf dem Bauch liegen, ohne sofort loszubrüllen, zum Beispiel. Auf dem Bauch liegen und lächeln. Sich in Bauchlage auf die Unterarme hochstützen. Das erste Mal in Bauchlage nach etwas greifen. Auf dem Bauch liegend mit etwas spielen... Es ist sozusagen eine ganze Flut an "Meilensteinen", jeden Tag. Weil für eine Mutter (besonders mit dem ersten Kind) lauten die Meilensteine nicht nur "Drehen, krabbeln, laufen, sprechen". Oooh nein. Nein nein nein. Letztens habe ich Ellinor in den Autositz (AKA Staatsfeind Nr. 1) gesetzt und sie hat ... gelächelt! Gelächelt statt geschrien als wäre der Leibhaftige hinter ihr her! Zum allerersten Mal! Und ja, während andere jetzt müde lächeln - für mich war das ein riesen Durchbruch im Leben meines Babys.

Der Liebste meinte letztes, man müsste sich diese Meilenstein-Momente, die großen und die etwas kleineren, doch eigentlich aufschreiben, damit man später in 10 Jahren noch weiß, was E wann gemacht, gesagt und gelernt hat.
Recht hatte er.
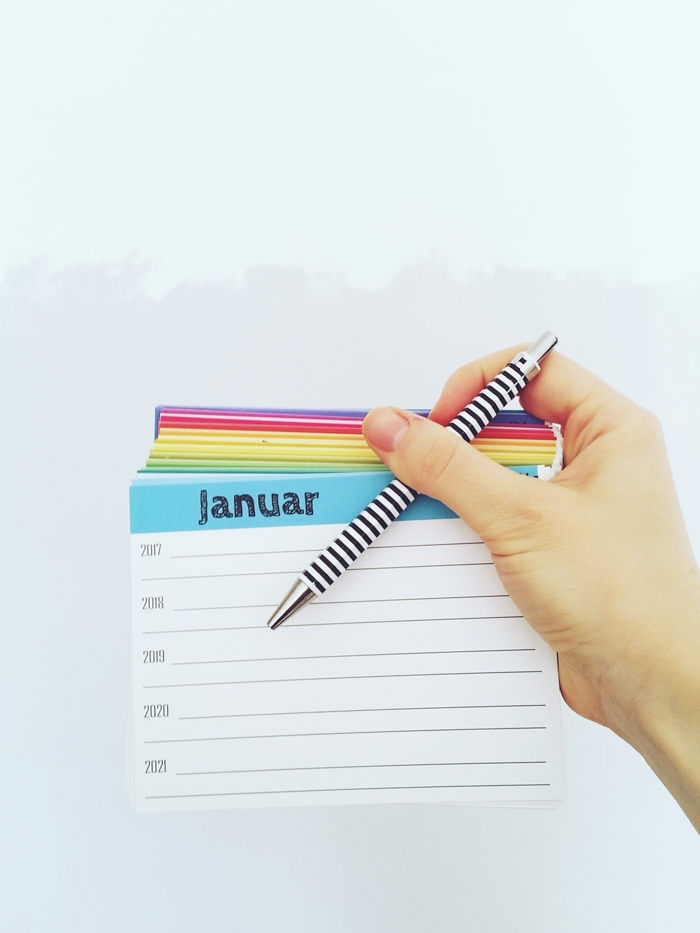
Also entwarfen wir ein paar hübsche Kärtchen, die nach Monaten, Kalenderwochen und Regenbogenfarben (letzteres war natürlich meine Idee!) geordnet sind, und auf denen man vorne und hinten auf 2 Zeilen kleine Notizen vermerken kann - und zwar von 2017 bis 2026! 10 Jahre lang! Irgendwann kann man dann nachsehen, was diese Woche besonderes passiert ist, was vor einem Jahr in dieser Woche und was vor 5 Jahren. So hat man nicht nur viele kleine Erinnerungen, sondern kann auch sehen, welche Entwicklung es im Laufe der Jahre gegeben hat. Natürlich geht das ganze auch mit anderen Dingen, als den Baby-Meilensteinen. Wir werden einfach immer eintragen, wenn etwas Schönes, Spannendes, Erinnerungswürdiges passiert ist. Babybezogen oder nicht. Ich freu mich drauf.

Und da ich gerne teile (und weil es so viel Arbeit gemacht hat), habe ich heute die Vorlage für alle, die auch gerne so ein schönes Erinnerungsprojekt starten wollen.


Eine kleine Anleitung:

Das PDF-Dokument besteht aus 53 Seiten: 52 Vorderseiten, mit den Kalenderwochen drauf, und eine Rückseite. Das Kartenformat, das ich verwendet habe, ist 13,75cm x 10,5cm. Das ist etwas ungewöhnlich, weil ich weiße Pappe wiederverwendet habe, die beim Basteln der Rahmen für meine Stickbilder übrig geblieben ist, und die hatte nun einmal diese Größe. Schneidet euch also, bevor ihr mit dem Drucken beginnt, 52 Karten aus dünner weißer Pappe oder stabilem Papier in der entsprechenden Größe zu und stellt vor dem Drucken diese Größe auch als Druckerpapierformat ein, sowie "Randloser Druck".
Testet am besten einmal, ob beim Drucken alles funktioniert. Dann druckt zuerst Seite 1 bis 52. Das sind alle Vorderseiten. Danach druckt ihr 52 Mal die Seite 53 auf die Rückseite aller Karten. Voilà! Fertig sind die Erinnerungskarten. Jetzt nur noch einen hübschen und leicht erreichbaren Ort zum Aufbewahren finden und fleißig Erinnerungen aufschreiben!

Viel Spaß dabei!

18. Dezember 2014

6. Dezember 2014

Gift guide for her | 2014

 photo giftsforher_zps5aeac814.jpg

After a gift guide for guys there has to be something for the ladies, too. Some things to wear, some things to use, some things to decorate the home with. And when in doubt, go for sparkly.
I personally would like to have everything on that list (do you hear that, relatives!?). Except the boots. Because I already got me a pair of those as a Christmas gift to myself. Your welcome, me.

30. November 2014

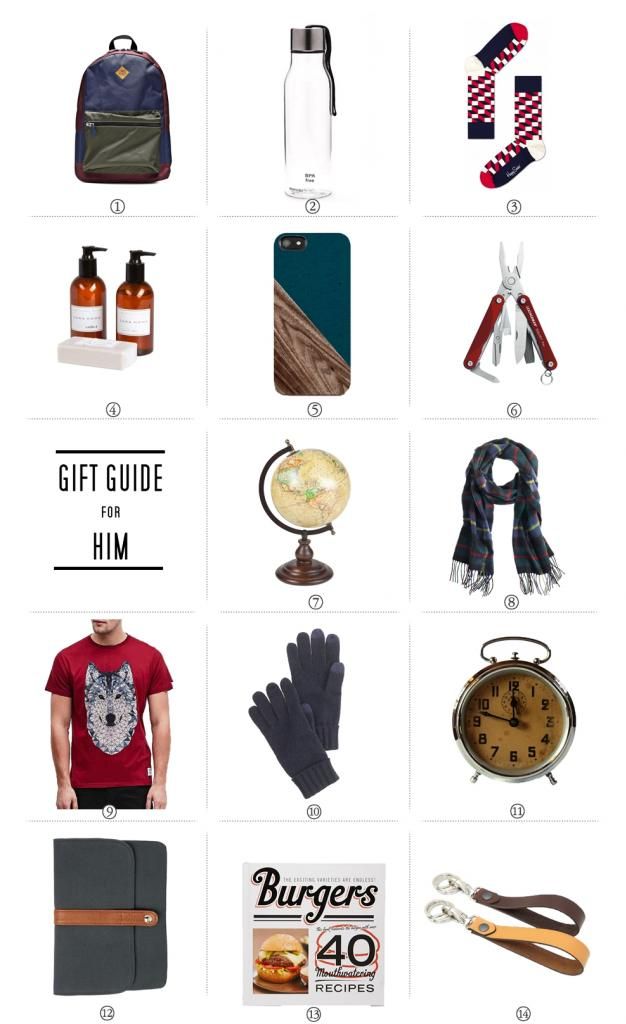
Gift guide for guys | 2014

 photo giftguideforhim_zpsb87792df.jpg


Hey! I'm throwing in some great gifts for guys today!
For me Christmas shopping for guys is the worst. Know those dudes with no wishes, no hobbies, no interest in books  and no time (goodbye activity gifts)? Yeah, well, being the only girl, I have a whole family of those.
Not. Amused.
You would think I'd be kind of an expert by now, but finding a thoughtful and personal gift is driving me crazy every single year.
If  I have absolutely no idea what to get the men in my life, I pick one ore two of the gift ideas above. They may not be super unique or rare, but they're a safe bet for happy faces on Christmas Day and that's worth something, isn't it?

15. Februar 2013

Tiny Origami Boxes DIY


These last few days I spent my new free time with all the small and simple things that make life so lovely: sleep, a good book, donuts, late night walks, thoughts about science-unrelated things and one or two hours of Sims3 (I swear that's the only addiction I have!!!). I also started crafting again, as promised, and made these cute little Origami boxes this morning. They are so simple and so adorable I made whole bunch. Because... there's always use for tiny boxes, right? They are the perfect little gift boxes or jewelry storage or they could hold small things on your desk or smaller craft supplies. Or just use them to decorate your room, just because they're so darn cute!

Supplies: 2 sheets Origami paper (6''x6'' gives a 2''x2''x1'' box). Scissors, ruler and pencil.
And just because I had so much fun making them and also because I found it difficult to explain the steps how to fold such a box, I made a little gif for you! It shows how to fold one part of the box. For the second half, cut of 1/4 inch on two edges of the paper making a 5,75''x5,75'' square. This helps you to put both parts together in the end without getting wrinkles or dents. Cut of 1/4 inch and they fit together just perfectly.


If you can't follow my gif because it's too fast or too complicated or too bad, I recommend this page. It's also only an animation, but you can stop it or speed it up or slow it down. Anyways, I hope you have just as much fun as I had making these.

Have an awesome day!

15. Dezember 2012

Three Stamps - Many Possibilities

All Christmas cards written? All presents wrapped? Only ten days until Christmas and time is running! I want to share a cute tittle last minute project with you. With these three simple stamps and some markers you can create a variety of motifs like candles, hot chocolate mugs and gift boxes in different shapes and sizes and a lot more! Use these to stamp your own wrapping paper, embellish gift tags or create last minute Christmas cards. All you need are these simple stamps, markers and some imagination.

Supplies: An old eraser (well, or a new one!). A pencil. A cutting and a carving tool. Paint or a stamp pad.

[1] First of all, draw three different sized rectangles onto the eraser. You may want to sketch on a paper first. Draw a different pattern on every rectangle.
[2] Roughly cut out the rectangular motifs using a cutting tool or a sharp knife.
[3] Now, trace the outline with the cutter and cut in the pattern afterwards. A carving tool like the one I used works very well. Your stamps are ready!
[4] Start stamping! You can still adjust the stamps until you're pleased with the result. Now you can get started and think of possible motifs like these shown in the picture or much more.

Have fun creating and enjoy the final days of Christmas shopping, gift wrapping and card writing!

14. Dezember 2012

10 Favorite Homemade Christmas Gifts

This year most of my Christmas gifts for friends and family are homemade. It's the first time that ever happened. I used to spend a fortune for Christmas gifts. For a student's budget of course. I'm not satisfied with getting just "something" for everyone. It has to be something personal, something special for them. I hate it to give just money or these "I didn't even use my brain to think of something special"-gifts that everyone gets and everyone buys occasionally... like bathing sets (nothing against special handpicked bathing sets, you know...).
This year I'm a little short on money. Maybe this is the reason for my homemade-gifts mood. Or it's because I finally realized how much great gifts I really can make myself and for less money. Fact is: I love creating something special for everyone I love! It kept me quite busy the last few weekends but it was worth it. Totally.
So here are some of my favorite Christmas gifts this year that you can make yourself and which are beautiful, too! I didn't make all of them, and I also made some gifts that I didn't show here, simply because I don't want certain readers of this blog to know what they will get.

one - Embellished notebooks. Cheap, easy and fast. And as personal as you want it to be. Can you ask for more? Read more about it on Grossstadtprinzessin's blog.
two - Design a set of nesting dolls! So cute but easy to make with the tutorial on Say Yes To Hoboken.
three - Cotton tote bags are a must-have. Make special ones for all of your friends! The possibilities are endless! You can stamp on them, sew on them, dye them or everything at once. And if you have just no idea find a great variety of cotton tote bags to buy on Idiopix.
four - Mug Cosies are one of my favorite things to have. A mug cozy makes the event of tea-drinking a little extra special. Believe me. Bubblegirl Knit And Crochet offers a free pattern for a cute crochet mug cozy and you can make a bunch of them in a short time!
five - Everyone wants to have hand painted mugs like these in their kitchen! And all you need is a porcelain pen (cheap!), plain white mugs (also cheap!) and an idea for a design. See the full tutorial here on Curious and Catcat.
six - I love those jars with cookie ingredients in them and all you have to do is mix it all together in a bowl, add maybe some butter and an egg or two, make balls, bake them and you have the most delicious fresh warm cookies! How great is that!? Bakerella offers a great tutorial for Cowboy/girl Cookies in jars with great pictures and free printables!
seven - Infinity/circle/cowl/loop scarves don't only look good, they're also easy to sew or to knit and the perfect gift for boys and girls in the cold season. There's an easy sewing tutorial on Jule for unique people and for a beautiful knitted one on People Webs.
eight - Turn photographs into canvas portraits in a few steps. The result is stunning, I made some myself (see here). Find the full tutorial over at A Beautiful Mess.
nine - Dip dyed spoons. I swear I thought of buying a bunch of new wooden kitchen utensils and paint them just to have them. Just because they are adooorable. Just because. See how it's done at House of Earnest.
ten - I love this DIY bracelet for Christmas. I found the tutorial on Simply Allis and I will definitely make one for myself soon.

I hope I could inspire you to try and create some personal and unique handmade gifts for your loved ones! Merry Christmas season everyone!
Related Posts Plugin for WordPress, Blogger...